Faux Roman Shades
When we first moved into our New Rome Home, I purchased fabric for the Ottoman and some fabric for the loft. The fabric for the loft was on clearance and was only a few yards. It was under $10 for the fabric which I love because it incorporates the tone on tone/gray/beige that I am striving for.

There were several different tutorials online on the best way to make the faux Roman Shades. The shades end up being somewhat "fixed" (do not move) and you inside mount rods (or use tension rods) to control how you want the fabric to lay. This was an option I liked as I have a toddler and also didn't want to spend time adjusting the curtains.
I only had enough fabric for a single layer, I actually tore out the rod pocket at the top and the bottom hem and added a liner due to the light filtering through and I didn't like how they hung on the particular rod I used. I will show you both ways.
Single layer Faux Roman Shades
I wanted my shades to fit inside of my window casings so I measured my windows and added 2 inches on all sides for my hems. For the top, I added and additional four inches to allow for a rod pocket to slide the curtain rod through to attach to the window. I wanted to try the No Sew version and used Liquid Stitch for the hems.
I placed my fabric on the floor of the loft and cut it in half for my two windows. I then aligned the fabric side by side so that the curtains were identical and the patterns would match when hung on the windows. I used the yard stick and tape measure to measure for my hem allowances and then pinned all of the hems and measured again. I used the iron to create nice crisp edge.

I used the liquid stitch to secure the hem on all sides leaving a space where the rod would enter the rod pocket. I used a good amount of glue creating a wavy line down the length and across the top and bottom of the fabric. I let this dry while I measured the windows to mount the brackets.
Some of the other tutorials recommend you use tension rods to hang the curtain. Because they are moveable it does help with placement of the shade However, I wasn't sure how heavy the end curtain would be and I do not like how tension rods "sag" over time. Also, tension rods are affected by temperature and it causes them to just fall sporadically. I permanently mounted rods to my windows.
I used the IKEA Racka rods with their Racka side mount brackets.


Measuring the rod placement was a bit of a challenge. This is where the tension rods is probably a lot less stressful as you can move them around to get the desired feel/equal distance.
I used very little true calculations. I estimated the spot on the window that was the highest possible point on the window I would ever want uncovered by fabric and marked a spot inside the window casing.
I measured the distance from the top of the window to my mark and rounded to the nearest measurement easily divisible by 3, it was 21. I then divided that by 3 (for the three rods).
Because you drape the curtain over the rod to create the roman shade the lowest rod will always be covered with fabric. This mark should be fairly close to your original estimate.
I then used my tape measure to mark 7", 14" and 21" on both sides of the window. I screwed my mounts in place and secured the rods. Because you can manipulate the fabric, as long as your rods are level, if you are a smidge off with your measurements it's ok.
Recommended Product List
Liquid Stitch or Sewing Machine
Meter/Yard Stick
Tape Measure
Clothes Iron
12 Ikea Racka Brackets (side mount)
6 Ikea Racka Rods
Small mounting screws for brackets
Pencil
Sewing Pins
Fabric
Fabric
There were several different tutorials online on the best way to make the faux Roman Shades. The shades end up being somewhat "fixed" (do not move) and you inside mount rods (or use tension rods) to control how you want the fabric to lay. This was an option I liked as I have a toddler and also didn't want to spend time adjusting the curtains.
I only had enough fabric for a single layer, I actually tore out the rod pocket at the top and the bottom hem and added a liner due to the light filtering through and I didn't like how they hung on the particular rod I used. I will show you both ways.
Single layer Faux Roman Shades
I wanted my shades to fit inside of my window casings so I measured my windows and added 2 inches on all sides for my hems. For the top, I added and additional four inches to allow for a rod pocket to slide the curtain rod through to attach to the window. I wanted to try the No Sew version and used Liquid Stitch for the hems.
I placed my fabric on the floor of the loft and cut it in half for my two windows. I then aligned the fabric side by side so that the curtains were identical and the patterns would match when hung on the windows. I used the yard stick and tape measure to measure for my hem allowances and then pinned all of the hems and measured again. I used the iron to create nice crisp edge.
I used the liquid stitch to secure the hem on all sides leaving a space where the rod would enter the rod pocket. I used a good amount of glue creating a wavy line down the length and across the top and bottom of the fabric. I let this dry while I measured the windows to mount the brackets.
Some of the other tutorials recommend you use tension rods to hang the curtain. Because they are moveable it does help with placement of the shade However, I wasn't sure how heavy the end curtain would be and I do not like how tension rods "sag" over time. Also, tension rods are affected by temperature and it causes them to just fall sporadically. I permanently mounted rods to my windows.
I used the IKEA Racka rods with their Racka side mount brackets.
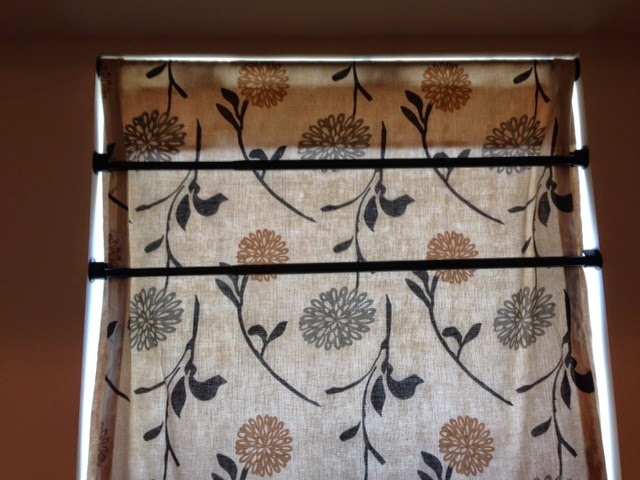
The Ikea brackets have a screw that secures the rod in place. For the TOP rod ONLY, I actually secured the rod using the screw more toward the top of the bracket, this allowed the fabric when draped over the rod to be closer to top of the window and also helped camouflage the bracket.
Notice on the second rod, it is resting as it should in the well the bracket.
Measuring the rod placement was a bit of a challenge. This is where the tension rods is probably a lot less stressful as you can move them around to get the desired feel/equal distance.
I used very little true calculations. I estimated the spot on the window that was the highest possible point on the window I would ever want uncovered by fabric and marked a spot inside the window casing.
I measured the distance from the top of the window to my mark and rounded to the nearest measurement easily divisible by 3, it was 21. I then divided that by 3 (for the three rods).
Because you drape the curtain over the rod to create the roman shade the lowest rod will always be covered with fabric. This mark should be fairly close to your original estimate.
I then used my tape measure to mark 7", 14" and 21" on both sides of the window. I screwed my mounts in place and secured the rods. Because you can manipulate the fabric, as long as your rods are level, if you are a smidge off with your measurements it's ok.
Having the rods mounted is better for my family. I like that these can't be pulled down (by a toddler) or fall accidentally. If there comes a time when I want privacy, since they are only folded over the rods a quick pull on the bottom and they will cover the window. It might take a few minutes to adjust them back again but not too terrible.
When I first mounted the curtains, notice how they don't filter out much light? This room gets very warm and since it's open to the top floor, I wanted them to block more light. I also didn't like how because the brackets were a bit higher than the rod the edges were a little uneven. If these had been tension rods, it probably would have hung better, since the tension rods are fairly level with no brackets.

Single Layer turned (lined) Faux Roman Shades
I took the curtains down and decided to add backing/liner to them. I had some solid color beige colored curtains that I was no longer using and followed the same procedure to measure and hem these to make the liner. My liner fabric coordinated with my patterned fabric but you could always double your patterned fabric and just make your curtain twice as long.
I will say that the liquid stitch held very nicely and it wasn't very easy to tear out the hems. I tore out the rod pocket hem and also the bottom hem. I ironed the creases out and used my new liner to create one big ring of fabric. The end result looks like one of those Eternity Scarves.
I did use my machine to sew the two pieces (short end to short end) together.
I hung the new "lined" curtains back up and instantly realized why so many others doubled up on the fabric. Either using coordinating fabric or a continuous piece of the patterned fabric. The added weight and the lining (more fabric) really added dimension and stability to the curtains.
Once up, you can manipulate the fabric to however you would like. Right now, I like the equal sections but will probably change the configuration to something more like this.


Two folds
3 Folds (stacked closer to bottom)
3 Folds (stacked close to bottom)
3 folds (stacked more equally)
Here is what the curtains look like from the outside (back of curtains). All you can see is the lining and no pattern. You need to keep in mind what you want the world to see. :)

Comments
Post a Comment