Miniature Mudroom Makeover
As mentioned in previous posts, our previous 1500 square foot house, the floor plan placed the dining room as the first room as you entered the front door. The previous owners converted this room into a bedroom with a closet. When we moved in, I used it as my office.
This made it awkward to use the closet for coats or for anything else other than my office supplies. Because we had no hall closet on the main floor, we had a terrible habit of hanging our coats on the bannister even though there was a coat tree in the hall.
In our new house, we have a hall closet and everyone still uses the bannister to hang coats.
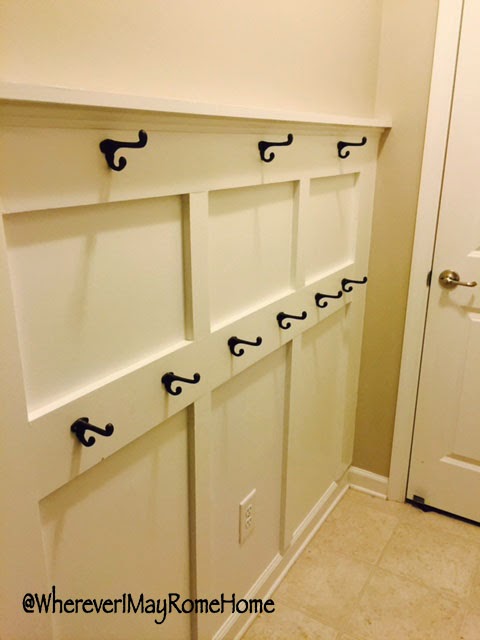
I don't have a dedicated "Mudroom", but I do have a hall area that leads to the garage. I wanted to add some hooks in this area. So, my first stop, Pinterest! I love that handy site. Here is how it turned out, I am tickled with it.
The first thing I did was determine how many hooks I wanted and the placement of them in relation to my board and batten. I was very nervous about using any other material other than pine boards due to the weight of coats and bags that we might be hanging on this. I want to continue the Board and Batten throughout the hours and may use something different. However, for this project I used Top Select Pine Boards.
I went to Lowes and bought
(4) 1x6x6 Top Select Pine Boards (outer vertical pieces and horizontal pieces)
(3) 1x2x6 Top Select Pine Boards (for the picture shelf top and the small pieces for the inside pieces)
(1) Trim piece
(2) Paintable caulk tubes
Liquid Nails
Sherwin Williams Emerald Paint in Pure White
Raw Cast Iron Hooks found on Ebay
Level
I had made a mock drawing of how I wanted to placement of my boards by hours and hours of googling and Pinterest stalking. I knew I wanted wider boards on the outer edges and I did not want the horizontal boards to be equally spaced. I wanted a larger space on the bottom. I measured my wall and decided the placement of the vertical and horizontal boards.
I used a level to make sure all of the boards were in the correct spots. I used Liquid Nails and then brad nails to secure the boards to the wall.
Once all of the boards were secured, we caulked all of the gaps. These projects make you realize just how uneven your walls are :)
Then, O helped us sand the boards. Do be sure to get your caulk lines clean and tidy before they dry. We had a few areas that we missed and it was very difficult to remove later.

While I was doing this project, I decided to paint the walls as well. I chose BM Revere Pewter mixed by The Home Depot. I love the color in this hallway.

Originally, I'm not sure how, but I didn't count correctly. I ended up needing one additional hook. I asked the vendor on Ebay to sell me just one. Thankfully, he did!

This made it awkward to use the closet for coats or for anything else other than my office supplies. Because we had no hall closet on the main floor, we had a terrible habit of hanging our coats on the bannister even though there was a coat tree in the hall.
In our new house, we have a hall closet and everyone still uses the bannister to hang coats.
I don't have a dedicated "Mudroom", but I do have a hall area that leads to the garage. I wanted to add some hooks in this area. So, my first stop, Pinterest! I love that handy site. Here is how it turned out, I am tickled with it.
The first thing I did was determine how many hooks I wanted and the placement of them in relation to my board and batten. I was very nervous about using any other material other than pine boards due to the weight of coats and bags that we might be hanging on this. I want to continue the Board and Batten throughout the hours and may use something different. However, for this project I used Top Select Pine Boards.
I went to Lowes and bought
(4) 1x6x6 Top Select Pine Boards (outer vertical pieces and horizontal pieces)
(3) 1x2x6 Top Select Pine Boards (for the picture shelf top and the small pieces for the inside pieces)
(1) Trim piece
(2) Paintable caulk tubes
Liquid Nails
Sherwin Williams Emerald Paint in Pure White
Raw Cast Iron Hooks found on Ebay
Level
I had made a mock drawing of how I wanted to placement of my boards by hours and hours of googling and Pinterest stalking. I knew I wanted wider boards on the outer edges and I did not want the horizontal boards to be equally spaced. I wanted a larger space on the bottom. I measured my wall and decided the placement of the vertical and horizontal boards.
I used a level to make sure all of the boards were in the correct spots. I used Liquid Nails and then brad nails to secure the boards to the wall.
Once all of the boards were secured, we caulked all of the gaps. These projects make you realize just how uneven your walls are :)
Then, O helped us sand the boards. Do be sure to get your caulk lines clean and tidy before they dry. We had a few areas that we missed and it was very difficult to remove later.
While I was doing this project, I decided to paint the walls as well. I chose BM Revere Pewter mixed by The Home Depot. I love the color in this hallway.
Originally, I'm not sure how, but I didn't count correctly. I ended up needing one additional hook. I asked the vendor on Ebay to sell me just one. Thankfully, he did!

Comments
Post a Comment